
Hi everyone and i'm back with another practical mods or rather, addressing another common problems on Iswara. It's about central door lock actuator, or so called the gun!

Sorry but I think the gun fails quite often too...
Why is it called actuator or gun? This is because normally, a stock central lock actuator, sometimes also called central lock solenoid, looks more like a boxy type of design, at least for Protons. For the originals, the central lock actuator should look something like this:

The central lock actuator shown above are the rear left and rear right actuator taken out from a separate day.
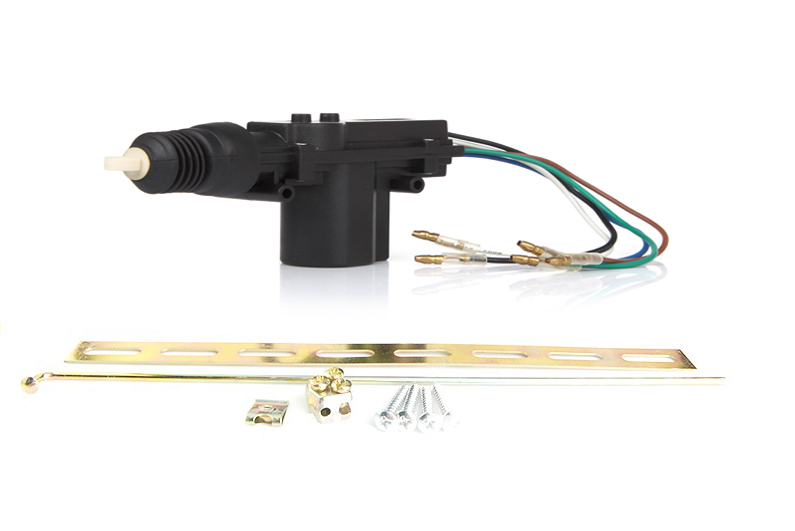
And here comes the third party central lock solenoids that claimed to "last longer", "providing higher torque", and yet they're that cheap! Accessories shop usually carries them at a surplus price when you ask them to change your door central lock. And not just that, they'll again make you informed that you'll need a "new mounting points" for your central lock, oh did I say that's how many charges in a row already?
Ini-lah pistol yang selalunya disembunyikan di sebalik pintu kereta.
Alright, speaking about the gun type, you'll first get your central lock actuator replaced to a third party ones, which, some screws that are supposed to be there on your door will be taken and left blank, letting rain water flow into your door like none of his business; Followed by some additional installation charge, which normally is simply, randomly drill some holes on your car door which the accessories guy "think that its not a problem to get your car door drilled and let it rust because its so cheap to replace a door!".
So thankfully enough, I insists originals on all times as that's HOW, WHY, WHEN, WHERE, WHAT, and TESTED. That's how much force it should've needed to pull down or push up the door knob; That's why the central locking mechanism is designed in this manner to minimize wear and tear to your door hinges; That's where the central lock actuator should be, the mounting points also holds together which creates strength for the locking mechanism and hinges; That's when you should replacing your actuator as it won't bulge anymore, rather then getting randomly stucked; That's what the mounting points are, tuned or matched to just that much the door locking sound should be; And that's the PROVEN and TESTED design by the engineers! (Or you mean the bangla that simply drill hole on your car is an engineer too? Well... They'll probably tell you it won't rust your door too.)
So thankfully I insisted on the original boxy type or it is just me. Problem now is the passenger door actuator seemed to quit as it sometimes doesn't lock or doesn't unlock, making the driver to manually lock and unlock manually when the actuator feels bad on that particular day.
So here comes the dis-assembly guide for the door panel.
So here comes the dis-assembly guide for the door panel.

STEP 1:
First remove the red screws from the panels. If they're covered, get the flap off and unscrew it. You will also need to remove the triangle protective plastic cover on the side mirror adjuster to get the panel out.
After that, the green boxes labels all the clips behind the panels. You'll like to pop them up. Pop one and others will be easy for you.
After popping up all the clips, the purple area is just holder by gravity and "hook" from panel. Simply lift the panel reversing the gravity direction and it'll come out smoothly. Get ready to balance the panel and find a place to put where you won't get scratches on your panel. Accessories guy, nah they'll just rest it on the wall and there goes your panel trim scratches, whole line of it on the most obvious place. If you place it with the "window fabric liner" against the wall, nah get ready for your tinted film to scratch, can be very deep until you'll replace a new film.
Tips: If you need to rest it, rest it on a wall or something height of pail, so you don't get the window liner on the wall. Get some newspaper on the floor and make sure no sands or stones to scratch the panel. If wanted to lay to wall on panel side, get some cloth to cover the panel so that leave no scratches. If you really need to rest the "window fabric liner" against the wall, I suggest masking tape the whole liner before resting on wall as the stones or risk DEEP scratches from minor dirt from wall. (Imagine have a tiny tiny tiny tiny sand/dust on the liner, and you lower down the window and up the window back, GONE! One whole line of DEEP scratch going diagonally across! I don't like it on my cheap tint and I bet you won't like it on your Huper or 3M though)
Tips: If you need to rest it, rest it on a wall or something height of pail, so you don't get the window liner on the wall. Get some newspaper on the floor and make sure no sands or stones to scratch the panel. If wanted to lay to wall on panel side, get some cloth to cover the panel so that leave no scratches. If you really need to rest the "window fabric liner" against the wall, I suggest masking tape the whole liner before resting on wall as the stones or risk DEEP scratches from minor dirt from wall. (Imagine have a tiny tiny tiny tiny sand/dust on the liner, and you lower down the window and up the window back, GONE! One whole line of DEEP scratch going diagonally across! I don't like it on my cheap tint and I bet you won't like it on your Huper or 3M though)
STEP 2:
Peel the weathershield off! Alright just peel off the left side. Basically lower left and upper left. I don't peel all the way as the "gummy gooey" seal will get less and less sticky, and eventually your weathershield doesn't bond anymore due to dust, oil from fingers, age or the weathershield itself. Just peel "enough" to allow your workspace "not to be compromised", rather than "comfortable".
STEP 3:
Identify the root cause of the problem by inspection. Start by locking and unlocking the door via central lock system or alarm. Saw the green holder connected via a rod to a blue holder? That's the central lock mechanism, yea JUST ONE ROD. A weak central lock motor will not be able to "pull" and "push" the lock mechanism enough to make it lock or unlock. Basically it's just overcoming friction of the door hinges, but at its position, you'll find out pretty much force is needed though. Basically central lock motor doesn't get damaged, it's just getting weak.
If you found your rod had misaligned, loosen or fell somewhere else, just replaced it back to its original position. Retest to ensure that solves the problem.

STEP 4:
Here comes the cash part. My central lock motor is weak and guess its time for the 7 years old original Proton actuator to retire. Went to spare parts shop and they'll give you the gun type. Insists on box type, i'm not going to retrofit it with gun type, it's just too unnecessary.
After searching, they can't find the one for Iswara so they gave me a Wira one to fit. This will make me re-use back my old bracket as the bracket is entirely different from the Iswara's one. Note that all the actuators are shaped the same, the difference, if any, would be the inclining angle of the metal piece connecting the motor and the rod. For rear, there is a difference between Iswara and Wira's one and may need more modification to fit. This is due to the angle difference on the metal joining the motor and the rod. So DO insists on Iswara's one as the Wira modification won't work well.

So here it is, original on the right and the Wira's new actuator on the left. The bracket is totally different from the Iswara's one, a google search will bring you a result from another blog. It's a piece of oddly shaped unbalanced design metal. Oh by the way I had checked out the parts at Proton Parts Centre, the original part is OBSELETE! So just settle with anything or brand that spare part shops give you as long as the price sounds reasonable for you.

I then removed the mounting screws from the Wira actuator and test it. The strength of the new actuator is just powerful.

I left it hanging like this while testing the new central lock actuator. The power during rotation can make the actuator shake and not just vibrate!

STEP 5:
Now you'll like to remove the old central lock actuator from its place. The placement spot is very difficult to reach and to work with, and you have no access to any screws as well. So I re-summon the picture you just looked at again because you blinked your eyes.
You will need to remove the 3 screws around the door latches, one above and two below. This will allow the door latch to be "out of place" enough to install the actuator. Another screw, which is the only screw below the door latch, yes the grey one, will also need to be removed.
Next, remove all the linkages, no matter it is orange or green. You'll realized that the door latch and everything seemed stuck in place even without all the mounting screws. That's how strong the linkages are holding the latches and locks. Removing the linkages will allow you to free more movements that are required to replace the actuator.
STEP 6:
Now I should re-summon the last picture cause you didn't stare at it long enough.
You'll then realized that there are two vertically mounted screws beside the green holder and below the orange holder that holds the bracket within. The screws are screwed from within! What kind of design is that? And how are you going to unscrew that? I was puzzled and concluded that to remove that, it will take much more time and probably gonna take apart the whole door knob mechanism as well. As it's getting complicated, I recommend the following steps as an alternative.
Since the bracket loves to stay there, let it stay!
Unscrew two screws in this way!

Now you'll find there's one more remaining screw. And guess what, you just need to angle here and there and you'll find the third screw positioned just nice in the glory hole below... That took me sometime to figure out. Once you unscrew the third screw, the motor can be removed, catch the motor or it'll send an audio shockwave through out your clumsy all metal car door.

So that saved all the hassle you'll need to take apart the bracket, you had just removed the old actuator!
STEP 7:
Refit the new actuator by reversing back step 6. You can screw the actuator in any order you want. And hey do remember the metal rod yea, take it out and placed it onto your new actuator! If you don't do it now it'll be much difficult to do it later!
STEP 8:
Align the door hinge. Hold it in place and start fixing all the linkages back into its original position. It's not difficult to mess up the order or position as the linkages rods are rather fixed in position since they are out from factory.
Align the door hinge. Hold it in place and start fixing all the linkages back into its original position. It's not difficult to mess up the order or position as the linkages rods are rather fixed in position since they are out from factory.
STEP 9:
Reverse step 5. Test it now! Feel the power of the new actuator! (Or the power of your money well spent at least)
Reverse step 5. Test it now! Feel the power of the new actuator! (Or the power of your money well spent at least)
If your new motor is also weak, unable to lock or unlock properly, read further below after these steps.
STEP 10:
Reverse back Step 3, Step 2 and Step 1. Inspect for any abnormalities, place back weathershield, and place back the door panel. You're done!
Reverse back Step 3, Step 2 and Step 1. Inspect for any abnormalities, place back weathershield, and place back the door panel. You're done!
Note for those coming from Gun type into Box type:
If your car is modified into gun type and the bracket and screws are gone, congratulate your ex-owner or your accessories men. You've made your life harder to re-convert into boxy type.
Boxy type central lock actuator is also much quieter and elegant when working. Boxy type actuator locks the door lock more softly and due to its mounting and constructions with the door and bracket, sound is minimized a lot. The gun type is just making too much noise as its powerful, that bothered me, making the locking and unlocking feel like breaking something everytime.
Speaking about powerful, the gun types are normally mounted parallel to the door knob. Yes in theory this gives the most powerful force to lock and unlock as its a direct drive, rather than rotational drive instead. But sometimes I don't think I need that "powerful" force to lock or unlock. It's like punching the hinge down and sending the door knob flying during locking and unlocking. And that is further worsen by the hinge design where locking and unlocking will strike a middle metal. Here comes the cheap locking noise and hopefully you didn't make any metal bent yet.
Now about the metal part, if the accessory installer drilled on your car door metal, you're going to have a bad time, you'll suffer from rust on the car door panel, or the useless screws they used that catalyze the rusting process. Please note that water does goes in to the area we're working here and rusting is pretty much easy without any paint/coating on. That is why Proton had coated a layer of anti-rust in the door and even weathershield it in first place! Try running your finger on the inner door panel metal, sticky right? Not mentioning the working noise is amplified by the thin door metal that's holding the gun.
My previous genius owner changed all four to gun-locking type. I spent sometime to re-convert them into the originals ones. I'll now speak from my experience in converting the gun-type into they box type for my car:
In Step 5, you may not have the screw. Get the screw from spare parts shop or ask from you mech friends for one piece to screw the actuator bracket. That's the important link that'll hold the bracket and the actuator together. Nothing replaces that, you can't even reach to glue or weld the bracket if you want to.
In Step 6, you don't have any screws! I replaced mine with cable ties instead, making it to loop together with the bracket and the holes from the door hinge. You wanna make sure the cable ties are good and tight. If it's not tight enough, your actuator can't efficiently transfer the power to the lock rod as it will move, and you'll pretty much peel your weathershield again very soon to readjust. If any of cable ties snaps, not only it causes the the door lock and unlock to fail, you'll get annoying metal clunking sound when your car vibrates as the bracket comes into contact with another metal, that are supposed to be fastened together.
One thing good about this step by using cable ties is it'll be unnecessary to unscrew the 3 screws on the door hinge. This is actually good as you can see the washer on the door hinge is pretty sharp to pierce the car paint into door body. This is to make sure the door hinge doesn't got loosened up overtime due to vibration and age, causing door randomly open or flew off during cruising. By using cable ties, the 3 screws will stay with the car door forever and each time you replace the actuator would only need you to cut the cable ties off, not mentioning you can change the bracket for new one too!
Note for unable to lock or unlock even changed a new actuator:Get a new one from where you bought. But I think most slightly they will reject as you had, opened the packaging, and, OPENED THE PLASTIC BAG. But it's really their product fault! The actuator is so weak that it can't even push it in place! Nope sorry but they normally won't admit it, they'll give some sort reason of your central lock relay weak and all sorts of reason even blaming you installed not properly or had spoiled it or blaming wiring problem, for not exchanging it for you.
So I guess I can't get an exchange? Here's what you can do: (It's complicated, I took few days to fine tune after installing)
You'll need to get some metal rod in this process. Have a look at the picture below:
You'll need to get the metal rod (stick) and the link connector fastener (gold box with screws). Its sold at car accessories shop or some car accessories shop in Jalan Pasar. First, you'll parallel the new metal rod with your door knob pin metal rod. Then, you'll reach the new metal rod to the hook shaped metal rod from the boxy central lock actuator. Some adjustment will be needed on different lengths of the connecting rod to enable the lock to lock and unlock properly. Once you've decided the length, proceed with cable tie on the yellow circled part. This will hold the rods together properly. Link connector is not used as the boxy actuator will make rotations during lock and unlock, we do need some free play on rotations, but what we need the more lateral force from it. It'll take some time to adjust this and you'll need to place the door
panel back to reconfirm whether is it working properly as some rotational
force is "convert" into lateral force through the door pin hole on the door panel. This will make the door unlock. Locking action will require much less adjustment.

Do ensure the "lock" and "unlock" operations are smooth. If there is jitter on joins, place more cable ties to make sure the force doesn't split up in the intermediate yellow circled part. It's difficult to find a balanced lock and unlock position in this case. Always make sure the central lock actuator is more favourable or bias to stay in "lock" rather than stay "unlocked". You'll rather manually unlocked your car than locking it. Why? Imagine if the lock doesn't lock up properly and you had moved away from your car, thinking that arming your alarm had locked it well. And a grasp of door handle will pop the lock up if its not locked properly! The latch on door hinge has not traveled far enough to stay locked.
Alright, if this is not worth your time, I suggest getting another from another spare parts shop. Sometimes maybe it's just manufacturing defect or sometimes the product may had been stored too long, stacked together and magnets repelled until its weaker than usual, not sure with that.
Alright, if this is not worth your time, I suggest getting another from another spare parts shop. Sometimes maybe it's just manufacturing defect or sometimes the product may had been stored too long, stacked together and magnets repelled until its weaker than usual, not sure with that.
Hope these helps!
11 comments:
nak tanya la.door lock saya akan keep on trying to lock bila tekan brake masa lalu die tmpt yg bumpy & bergegar.mcm ada part yang loose.actuator or central lock yang problem?
Why is it called actuator or gun? This is because normally, a stock central lock actuator, sometimes also called central lock solenoid, looks more like a boxy type of design, at least for Protons. For the originals, the central lock actuator should look something like this:coppell tx locksmith
For proton wira, is it the same process?
For proton wira, is it the same process?
Actually its a lot easier than that...just pry the blue plastic to separate the metal rod and blue plastic. Once separated, just push the metal rod to the front and you just need to open 2 screws holding the actuator (metal bracket).
Pm me on fb (Nilok sunairam) if you assistance..
Pm me on fb (Nilok sunairam) if you assistance..
Hi there, where to buy the actuator?
yOU ALSO CAN BUY ACTUATOR BY LAZADA. CHEAPEST THAN SPARE PART SHOP.
Happen to me now. Gun only so now no bracket.
When it comes to choosing the right balcony door lock for your home, there are a few things you need to take into consideration. The first is the type of lock you need. There are a variety of different locks on the market, so you need to make sure you choose one that is appropriate for the type of door you have. The second is the level of security you require. There are a variety of different security features available, so you need to make sure you choose a lock that offers the level of security you need. We suggest you to visit KME Locksmith Dubai for the finest and most reliable locksmith company in Dubai Call us at: 0529533381.
Post a Comment